EN 000.9 Position Indicators Technopolymer Plastic, Positive Drive, with Analog Display

Photo

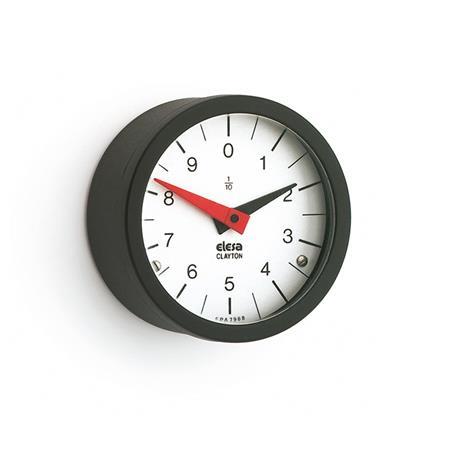
EN 000.9 Technopolymer Plastic Position Indicators, Positive Drive, with Analog Display Type: R - Numbers increasing clockwise
ELESA original design
code: PA11 / PA12
Type: R - Numbers increasing clockwise
EN 000.9 Technopolymer Plastic Position Indicators, Positive Drive, with Analog Display Type: R - Numbers increasing clockwise EN 000.9 Technopolymer Plastic Position Indicators, Positive Drive, with Analog Display Type: L - Numbers increasing counter-clockwise

Product description

Information

Position indicators EN 000.9 are suitable for installation in various types of operating elements.

Housing, and all internal components are an one-piece, ultrasonically welded assembly. They are spray waterproof and corrosion proof (Protection class IP 65).

The positive drive type installation allows the position indicator to be used in any position, even in applications with strong vibrations.

The reducing ratio shows the number of revolutions (long red pointer arm) required per 1 complete revolution of the short pointer arm.

Specification

Housing
Plastic
Technopolymer (Polyamide PA)

  • Glass fiber reinforced
  • Black, matte finish

Sight glass
Plastic
Technopolymer (Polyamide PA)

  • Transparent
  • Shock and aging resistant

Housing / sight glass

  • Temperature resistant up to 212 °F (100 °C)
  • Oil and solvent proof (not suitable for alcohol)

Pointer arms
Plastic

  • Long pointer arm: red
  • Short pointer arm: black

Scale
Aluminum

  • Matte, anodized finish
  • Black graduation lines and numbers

Protection class IP 65


RoHS

On request

Special scales

Technical drawing

3D
Hide technical drawing
EN 000.9 Technopolymer Plastic Position Indicators, Positive Drive, with Analog Display sketch

Part Options / Table

Type

RNumbers increasing clockwise
LNumbers increasing counter-clockwise
Show / Hide columns

Metric

Dimensions in: Inch (change to Metric)
d1Reduction
counting gear
d2d3l1l2
1.652:110:120:140:172:11.961.901.180.91
1.654:112:124:148:1100:11.961.901.180.91
1.656:115:130:150:1-1.961.901.180.91
1.658:116:136:160:1-1.961.901.180.91
2.362:110:124:150:1150:12.702.641.260.98
2.364:112:130:160:1-2.702.641.260.98
2.366:116:136:172:1-2.702.641.260.98
2.368:120:140:1100:1-2.702.641.260.98

Build & Price

3D Product Configurator
Outside diameter d1
Reduction
Type


Function

Fixed firmly to the housing or the operating element, the pointer shaft with the longer red pointer is mounted at the center of the position indicator. This pointer therefore shows the revolution of the spindle at a ratio of 1 to 1, at the same time turning in the same direction as the spindle.
The same pointer shaft loosely holds a carrier element, with the scale attached to one side and a gear wheel (1st central wheel) attached at the rear. A pinion inside the housing and protruding to the outside engages in a second gear wheel (2nd central wheel) which is fixed, i.e. attached to the machine side by means of a bracket (retaining system). The entire configuration constitutes a planetary gear.
If the position indicator (operating element) is turned, this planetary gear will ensure that the carrier element and therefore the scale remain in the resting position.
The rotary motion is transferred to the shorter second pointer via a gear wheel fixed to the pointer shaft and a reduction gear at the carrier element. Any position (rotary position) of the spindle can now be read with accuracy on the scale.

Use

Position indicators with positive drive are used for attaching to a vertical spindle or a spindle inclined by 60°. Also, the scale will not oscillate when exposed to external vibrations.
As the mechanical measurement system is relatively complex and requires a machine-side support, cost reasons limit the use of this position indicator to the above special applications.

Selecting the Reduction

While the longer red pointer shows the rotary motion of the spindle of a ratio of 1 to 1, the shorter black pointer makes only a fraction of the rotary motion defined by the reduction ratio.
The reduction ratio is selected depending on the maximum number of spindle revolutions over the entire range of adjustment. The preferred selection is the standard reduction ratio which is the same as or, if possible, slightly larger than the maximum number of revolutions.

Example:

Spindle adjustment range: 11 revolutions

Selected reduction ratio: 12 to 1

This selection gives virtually the whole scale range for the position indication.

Scale

The standard scales have divisions (number of graduation marks) matching the reduction ratio.
The numerical sequence also matches the reduction ratio depending on use, i.e. right turn (clockwise) or left turn (counter-clockwise).
If required and using a separately arranged table, the measured value corresponding the application in hand can be assigned to each scale number.
Special scales on request.

c4452348-7780-4043-a1c9-4ed46ec9a3c9

Selected Part

Total Mexican Pesos (net)
Mex$2,133.45
Call / Email for Delivery Time
Please note our quantity discounts (Mexican Pesos).
MinMaxPrice
13Mex$2,133.45
424Mex$2,055.87
2549Mex$1,939.50
≥ 50Mex$1,745.55
Prop 65: Not compliant
WARNING:
Cancer and Reproductive Harm - www.P65Warnings.ca.gov
RoHS: Compliant
This article is RoHS-compliant in application of Annex III., which means it complies with EU Directive 2011/65/EU, including extension (2015/863/EU), for restricting the use of certain hazardous substances in electrical and electronic devices. The Directive regulates the use of hazardous substances in devices and components. The implementation in national law is summarily described with RoHS(Restriction of (the use of certain) hazardous substances)).
Weight: 0.176 lbs
If weight is not listed, please contact our Sales Department for additional information regarding weight.
Phone: +52(81)2721-4021
All Prices are in Mexican Pesos. Taxes Not Included.

CAD Download

Other Data Formats

Email CAD File

To receive an email with a CAD download without creating an account, please enter your e-mail address. Max of 3 CAD files per day unless you create an account.

Please enter the code above.

CAD Download Tutorial About CAD Downloads
Save as Favorites

Please enter the code above.

Need Help?

Our service team is available from Monday to Friday between 8:00 AM and 6:00 PM Central Time: +52(81)2721-4021

Special Requests | Contact our sales team

EN 000.9-42-2-REN 000.9-42-2-LEN 000.9-42-10-REN 000.9-42-10-LEN 000.9-42-20-REN 000.9-42-20-LEN 000.9-42-40-REN 000.9-42-40-LEN 000.9-42-72-REN 000.9-42-72-LEN 000.9-42-4-REN 000.9-42-4-LEN 000.9-42-12-REN 000.9-42-12-LEN 000.9-42-24-REN 000.9-42-24-LEN 000.9-42-48-REN 000.9-42-48-LEN 000.9-42-100-REN 000.9-42-100-LEN 000.9-42-6-REN 000.9-42-6-LEN 000.9-42-15-REN 000.9-42-15-LEN 000.9-42-30-REN 000.9-42-30-LEN 000.9-42-50-REN 000.9-42-50-LEN 000.9-42-8-REN 000.9-42-8-LEN 000.9-42-16-REN 000.9-42-16-LEN 000.9-42-36-REN 000.9-42-36-LEN 000.9-42-60-REN 000.9-42-60-LEN 000.9-60-2-REN 000.9-60-2-LEN 000.9-60-10-REN 000.9-60-10-LEN 000.9-60-24-REN 000.9-60-24-LEN 000.9-60-50-REN 000.9-60-50-LEN 000.9-60-150-REN 000.9-60-150-LEN 000.9-60-4-REN 000.9-60-4-LEN 000.9-60-12-REN 000.9-60-12-LEN 000.9-60-30-REN 000.9-60-30-LEN 000.9-60-60-REN 000.9-60-60-LEN 000.9-60-6-REN 000.9-60-6-LEN 000.9-60-16-REN 000.9-60-16-LEN 000.9-60-36-REN 000.9-60-36-LEN 000.9-60-72-REN 000.9-60-72-LEN 000.9-60-8-REN 000.9-60-8-LEN 000.9-60-20-REN 000.9-60-20-LEN 000.9-60-40-REN 000.9-60-40-LEN 000.9-60-100-REN 000.9-60-100-L

This could also be interesting...

Your Contact

You are looking for a Winco partner near you? Please select the country.

JW Winco Services

Our service team is available from Monday to Friday between 8:00 AM and 6:00 PM Central Time

Request Callback
 
Our customers in the US are served by our local branch office.
 
J.W. Winco, Inc.
An error has occurred!
We have received your callback request and will contact you soon.